
Dies ist eine alte Version des Dokuments!
Inhaltsverzeichnis
 This page is not fully translated, yet. Please help completing the translation.
(remove this paragraph once the translation is finished)
Options

1. General

1. Shoe size system
The shoe size system can be set at this point.
- EUR (standard)
- Mondopoint
- UK
- US
- JAPAN
2. unit - length
The length units that the pedoffice should send is set here.
- mm (standard)
- cm
- in
- ft
3. unit - weight
The weight units can also be adjusted.
- kg (standard)
- g
- lb
4. location
If there are several locations in the database. The location of this workplace can be set here.
5. language
The following languages are available in pedoffice.
- German
- English
- Polish
6. PEDCAD dealer number
In order to be able to order from pedcad valinos or insoles, your customer number must be entered here. Please note that each location directly supplied by pedcad has its own customer number.
7. order register
Is the directory / interface to your own Picturs by PC. 
8. Company image
Here you can set your own company logo. This replaces the pedcad logo in the login screen.
9. Logging
In the event of program errors, the protocol level can be adjusted here.
- Debug
- Warnings
- Error (default)
- Major
10. Submit customer data
If this option is activated, in addition to the first name, surname and date of birth, the customer address will also be sent to pedcad for orders.
11. Submit billing data
If this option is activated, in addition to the first name, surname and date of birth, the customer's billing address and insurance data for orders are also transmitted to pedcad.
12. Workflow
There are two ways to send your order to pedcad.
- Standard workflow
The orders are immediately sent to pedcad when you click on send. - Shopping cart workflow
The orders are first placed in the shopping cork in order to be bundled and transmitted to pedcad at a later point in time.
2. database

1. data folder
Path in which the measurements are located and in the case of file-based database the database is located.
2. database
The database type can be changed from file-based database to SQL server here. The SQL server is recommended for large databases or multiple pedoffice clients. To set it up, please contact pedcad Service by email (service@pedcad.de).
3. server
Name of the SQL server
Example: servername \ inset name or 192.168.178.1 \ inset name
4. Database name
Name of the database 1) )
Example: pedoffice
5. Authentication
Type of the login procedure for the database 2) )
- Windows authentication only possible with a domain controller (user or user group share)
- SQL server authentication (SQL user)
6. Username
Name of the SLQ user 3)
7. Password
Password of the SLQ user. 4)
3. user
The pedoffice users can be managed here. 
Search users
By entering all or part of the first, last or user name in the search field (11) and then clicking on the button (12), the user list (red frame) is filtered accordingly.
To cancel the filtering, click on the button (13).
Create new user
- To create a new user, click on (9) New.
- Enter the user's first name in (1).
- Enter the user's last name in (2).
- Enter the user name - this is the name that must be entered by the user on the login screen in (3).
- If the user is to receive administrator rights in Pedoffice, the checkbox must be activated.
- Enter the password, this is the password that must be entered by the user in (5) and (6) on the login screen.
- Then click on (7) Save.
Change user
- To change a user, select the user to be changed from the user list (red frame). You can also use the Search user button beforehand.
- Now make the required changes in fields (1) - (4). Enter a new password in field (5) if required and repeat the entry in field (6).
- Then click on Save (7).
Delete user
Please note that only administrators can delete users. It is also not recommended delete the administrator user.
- To delete a user, mark the user to be deleted in the user list (red frame). You can also search for the user beforehand.
- Make sure that you have selected the correct user and then click on Delete (10).
- Confirm the deletion of the user by clicking on YES. Clicking on No cancels the deletion process.
4. Email
These settings are used to send orders to pedcad. Please make changes to these settings only after consulting the pedcad Service. 
Set / reset to standard settings
To get to the standard settings:
- Activate the Standard settings checkbox (1).
- deactivate the standard settings checkbox (1).
- Enter your email address in the Sender field (4).
- Click the Save button (9).
Port
If you have problems sending you can change the port (3) from 25 to 587.
5. Locations
Branches (locations) can be created here. These can be selected in the orders to track from which location the order comes and where it should be delivered. 
Create location
- Click the New button (8)
- Enter the name of your location in the Description field (1). This value is displayed in the selection.
- Enter your company name in the Address 1 (2) field.
- Fill in the remaining fields (3) - (5) with the address of the location.
- Then click on the save button (6).
Change location
- Mark the location to be changed in the location list (red frame).
- Make the required changes in fields (1) - (5)
- Then click on the save button (6).
Delete location
- Mark the location to be changed in the location list (red frame).
- Make sure that you have selected the correct location and then click on Delete (9).
- Confirm the deletion of the location by clicking on YES. Clicking on No cancels the deletion process.
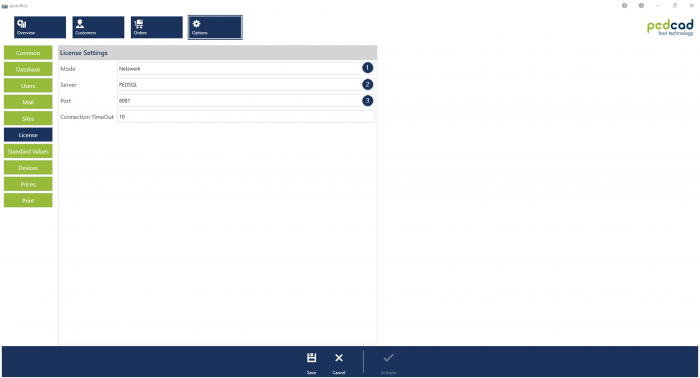
6. Licensing
This is where the values for licensing are displayed or the settings for network licensing are made. Only make changes after consulting the pedcad service. Otherwise there is a risk that pedoffice will stop working.
7. Standard values

![]() The following default values can be configurated:
Standard footbed shape of valinos orders
The following default values can be configurated:
Standard footbed shape of valinos orders
This is displayed behind the measurement until the - footbed shape - footbed variant - footbed design is defined in the configuration view.
![]() standard insoles
standard insoles
This is displayed behind the measurement until the insole type or shoe type is is defined in the configuration view.
Changing standard values
- Change the desired value in the fields
 -
- .
. - Then click save
 .
.
Delivery state of the standard values
![]() valinos
valinos
![]() CA-PVP-0-KL-Schuh
CA-PVP-0-KL-Schuh
![]() Spreizfuß
Spreizfuß
8. Devices
Measurement devices can be activated and deactivated to make the measurement bar clearer for deposits and valinos orders.

Messgeräte aktivieren/deaktivieren
2D Scanner
Durch aktivieren der Checkbox ![]() „Gerät installiert“ wird dieses Gerät aktiviert.
„Gerät installiert“ wird dieses Gerät aktiviert.
3D Scanner
Durch aktivieren der Checkbox ![]() „Gerät installiert“ wird dieses Gerät aktiviert.
„Gerät installiert“ wird dieses Gerät aktiviert.
Druckmessplatte
Durch aktivieren der Checkbox ![]() „Gerät installiert“ wird dieses Gerät aktiviert.
„Gerät installiert“ wird dieses Gerät aktiviert.
Insole-Druckmessung
Durch aktivieren der Checkbox ![]() „Gerät installiert“ wird dieses Gerät aktiviert.
„Gerät installiert“ wird dieses Gerät aktiviert.
Individuelle Einstellungen
2D Scanner
Nur ein Fuß
![]() Diese Option ist für Scanner die nur einzelne Füße vermessen können oder für den Import von Einzelmessungen die im Scanfester noch bearbeitet werden müssen.
Diese Option ist für Scanner die nur einzelne Füße vermessen können oder für den Import von Einzelmessungen die im Scanfester noch bearbeitet werden müssen.
Scanner-Dialog anzeigen
![]() Durch Aktivieren der Checkbox wird der Scanner-Dialog vom Scanner-Treiber angezeigt. Dieses ist zum Beispiel bei einem Scanner des Herstellers Mustek nötig.
Durch Aktivieren der Checkbox wird der Scanner-Dialog vom Scanner-Treiber angezeigt. Dieses ist zum Beispiel bei einem Scanner des Herstellers Mustek nötig.
Auflösungsdialog anzeigen
![]() Bei aktivierter Option wird jedes mal beim Importieren der Auflösungsdialog angezeigt, um die Auflösung individuell für jede Messung anpassen zu können.
Bei aktivierter Option wird jedes mal beim Importieren der Auflösungsdialog angezeigt, um die Auflösung individuell für jede Messung anpassen zu können.
Auflösung aus Datei verwenden
![]() Es wird immer die Auflösung aus der zu importierenden Datei verwendet, wenn der Auflösungsdialog nicht angezeigt wird.
Es wird immer die Auflösung aus der zu importierenden Datei verwendet, wenn der Auflösungsdialog nicht angezeigt wird.
Standartauflösung
![]() +
+ ![]() Stellen Sie hier die Standardauflösung für die X-
Stellen Sie hier die Standardauflösung für die X- ![]() und die Y-Richtung
und die Y-Richtung ![]() für das Importieren von Messungen ein.
Meist verwendete Werte der Hersteller.1)
für das Importieren von Messungen ein.
Meist verwendete Werte der Hersteller.1)
| Hersteller | X | Y |
|---|---|---|
| easyped | 72 dpi | 72 dpi |
| Rotballer | 150 dpi | 150 dpi |
3D Scanner
Für weitere herstellerspezifische Einstellungen wenden Sie sich bitte an den pedcad Service.
Druckmessplatte
Für weitere herstellerspezifische Einstellungen wenden Sie sich bitte an den pedcad Service.
Insole-Druckmessung
Für weitere herstellerspezifische Einstellungen wenden Sie sich bitte an den pedcad Service.
ohne Gewähr
9. Prices
