Lines
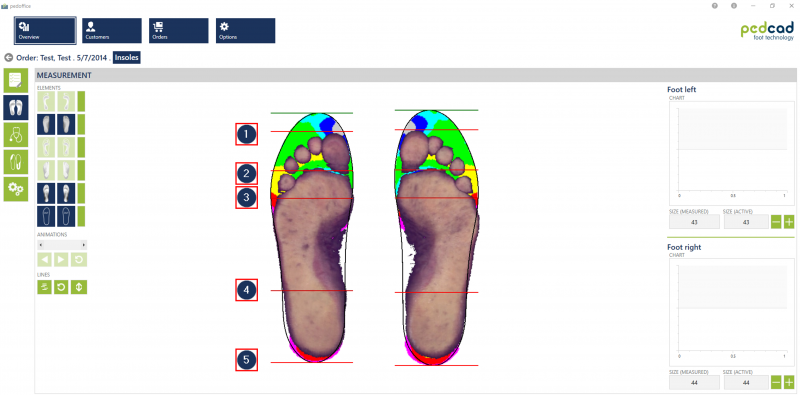
If you display an insole and a blank in the „Measurement“ area, lines are displayed on the insole as well (Fig.1 No.1-5). On the right side you will also see the size of the measurement, you can change the shoe size using the buttons ![]() and
and ![]() manually. If you have also scanned a foot pressure measurement, you can read the pressure values and the pressure curve in the diagrams on the right.
manually. If you have also scanned a foot pressure measurement, you can read the pressure values and the pressure curve in the diagrams on the right.

Click for larger view
Using the lines you can change various elements on the insole. To activate the function, click on the button ![]() . Now go to the respective line, hold down the left mouse button and move it forward or backward.
. Now go to the respective line, hold down the left mouse button and move it forward or backward.
| line number | display |
|---|---|
| end of the toes (according to measurement) | |
| end of the ball/ start of the toes | |
| end of the pelote | |
| highest point of the medial arch | |
| end of the insole at the back |
The front green line indicates the end of the insole in the front area, so that you can recognize the tip allowance. This line cannot be moved. The tip addition can only be changed in the options.
If the line ![]() is moved, the lines
is moved, the lines ![]() to
to ![]() are moved up in dependence. The tip addition is also adjusted accordingly.
are moved up in dependence. The tip addition is also adjusted accordingly.
The lines ![]() to
to ![]() are moveable independently.
are moveable independently.
To see the line values click the button ![]() . Now you can see the distances of the lines in mm.
. Now you can see the distances of the lines in mm.
If you are not satisfied with the way you have moved the lines, you can undo the operation using the button ![]() .
.
