
Dies ist eine alte Version des Dokuments!
 Diese Seite wurde noch nicht vollständig übersetzt. Bitte helfen Sie bei der Übersetzung.
(diesen Absatz entfernen, wenn die Übersetzung abgeschlossen wurde)
3D Scannen
To add a 3D-scan-measurement, go to the measurement area ![]() and click on the green button in the 3D-scan-area
and click on the green button in the 3D-scan-area ![]() . Now another area opens underneath, click on the button in the „Open“ area
. Now another area opens underneath, click on the button in the „Open“ area ![]() .
.
You can either perform a new measurement or load an existing measurement.
To perform a new measurement, click on the button ![]() , in the window that opens, select your 3D scanner from the drop-down menu in the Data area and start the measurement by clicking on the button
, in the window that opens, select your 3D scanner from the drop-down menu in the Data area and start the measurement by clicking on the button ![]() .
.
If you want to load an existing measurement, click on the button ![]() and select the measurement.
and select the measurement.
The scan window will open:
The scan window is divided into 3 parts.
| part Abb.1 | description |
| Here you can see which measurement is selected | |
| Here you can edit the view of the 3D-scan. | |
| Shows the result of the 3D-scan. |
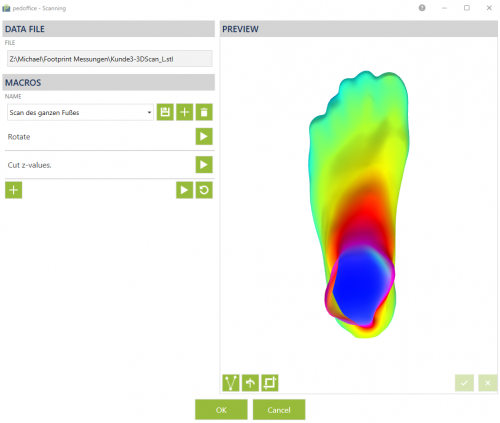
| In this area you can edit the measurement. |  | |||
|---|---|---|---|---|
| If you click on „Rotate“, a dropdown menu will open where you can set the axis and the number of degrees by which the measurement is to be rotated. The command is executed when you click the button | 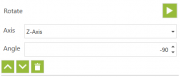 | |||
Click on the "Crop-Z-direction" area to open a dropdown menu. Here you can set the height at which the Z-cut (horizontal cut) should be made. The command is executed when you click the button {{:pedoffice:kunden:auftrag:messungen:gruen_play.png?nolink&17x16}}. With the arrows {{:pedoffice:kunden:auftrag:messungen:gruen_auf.png?nolink&17x16}} and {{:pedoffice:kunden:auftrag:messungen:gruen_ab.png?nolink&17x17}} you can change the position of the editing module in the list, on the button {{:pedoffice:kunden:auftrag:messungen:gruen_mueleimer.png?nolink&17x17}} you can delete the editing module.|{{:pedoffice:kunden:auftrag:messungen:3d-scan_beschneiden_in_z-richtung.png?nolink&180x56}}|
| Klicken Sie den Button | |||
| Klicken Sie auf den Button | ||||
| Klicken Sie auf den Button |
Sind Sie mit der Bearbeitung fertig, speichern Sie das Ergebnis, in dem Sie auf „OK“ klicken. Im nächsten Fenster klicken Sie nochmal „OK“ , danach wird der 3D-Scan im Bereich der Messung angezeigt.
Sie können nun auf der linken Seite die Transparenz der Messungen einstellen und die Messungen zudem ausrichten, dazu klicken Sie auf den Button „Verschieben“ ![]() . Mit gedrückter Maustaste können Sie nun die Messung verschieben. Mit den Pfeilen am oberen und unteren ende des Kastens können Sie die Messungen drehen.
. Mit gedrückter Maustaste können Sie nun die Messung verschieben. Mit den Pfeilen am oberen und unteren ende des Kastens können Sie die Messungen drehen.