Dies ist eine alte Version des Dokuments!

(diesen Absatz entfernen, wenn die Übersetzung abgeschlossen wurde)
2D Scan
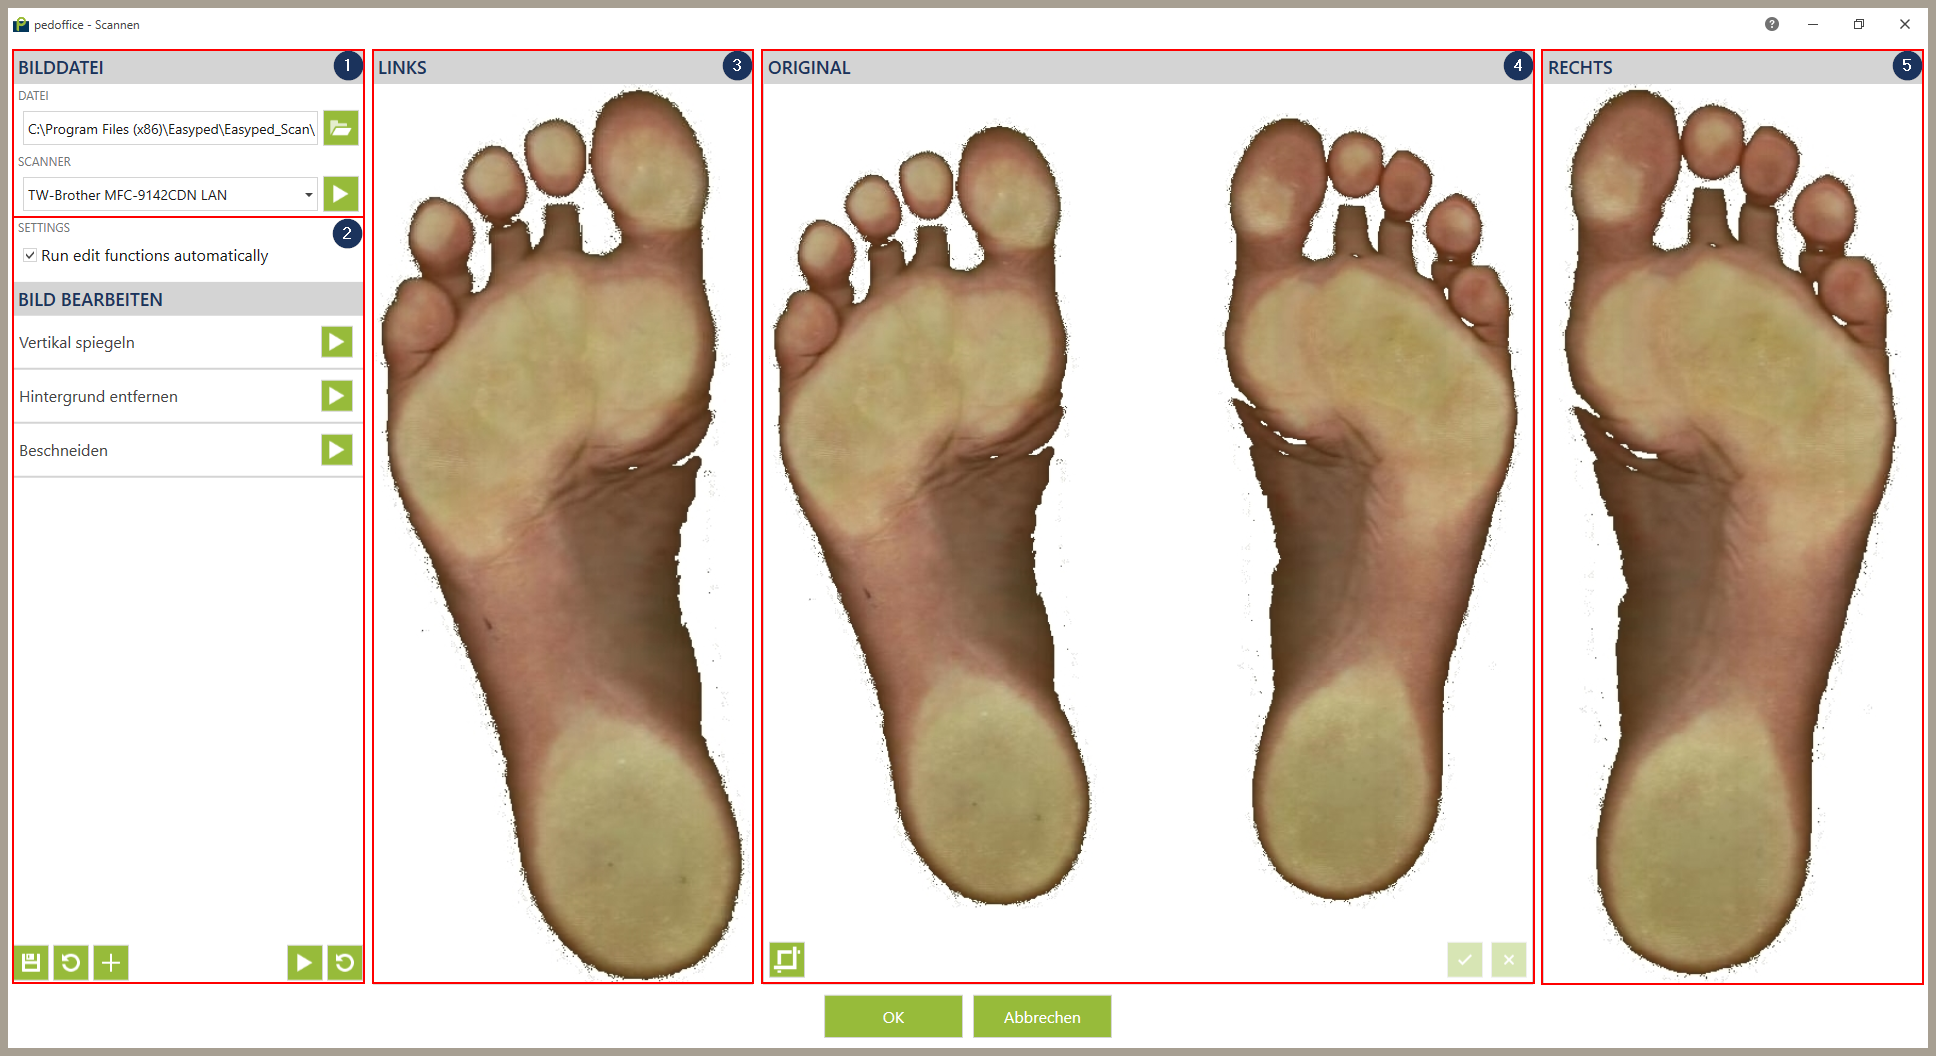
The scan window is divided into 5 parts.
| part Abb.1 | description |
|---|---|
| automatic image editing | |
| Result of the measurement of the left foot after editing. | |
| Shows the scan result. | |
| Result of the measurement of the right foot after editing. |

Für größere Ansicht Klicken
Image editing
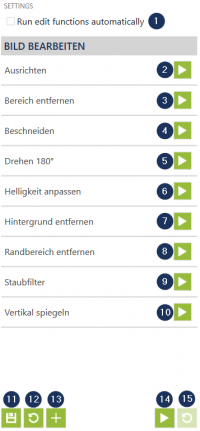
If the checkbox „Run edit functions automatically“ ![]() Abb.3 image editing will be done automatically after scan or import. Alternative you can click on
Abb.3 image editing will be done automatically after scan or import. Alternative you can click on ![]()
![]() Abb.3 . If the result is not what you want, you can reset the editing by clicking on
Abb.3 . If the result is not what you want, you can reset the editing by clicking on ![]()
![]() Abb.3 . You can edit the image by yyourself with the editing functions
Abb.3 . You can edit the image by yyourself with the editing functions ![]() -
- ![]() Abb.3 . You can cut the measurement manually: click on the button
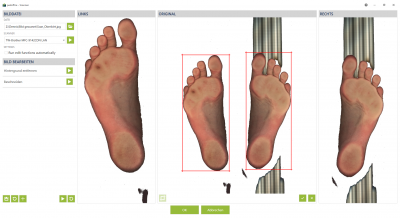
Abb.3 . You can cut the measurement manually: click on the button ![]() and adapt the red boxes arround the feetAbb .2 . Confirm your cut with
and adapt the red boxes arround the feetAbb .2 . Confirm your cut with ![]() or cancel it with the button
or cancel it with the button ![]() . If the result for the right
. If the result for the right ![]() Abb.1 and the left
Abb.1 and the left ![]() Abb.1 foot is good, click on „OK“ to confirm.
Abb.1 foot is good, click on „OK“ to confirm.

Für größere Ansicht klicken
All editing functions are optional and in the order freely configurable. Alle Bearbeitungsfunktionen sind optional und in der Reihenfolge frei konfigurierbar. Multiple addition is also possible. To edit an editing function click on it. The options open below. Click another time to hide them.

Für größere Ansicht Klicken
To change the order of the editing functions click on ![]() Abb.3 to move the function up one position. You can move the function down one position by a click on
Abb.3 to move the function up one position. You can move the function down one position by a click on ![]() Abb.3 .
Abb.3 .
To delete a function click on the button ![]() Abb.3 .
Abb.3 .
To add a editing function click on ![]()
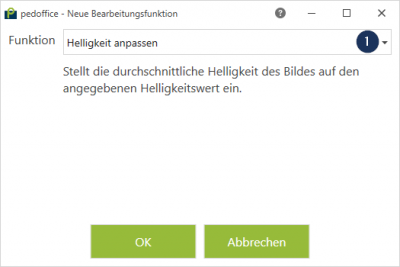
![]() Abb.3 . In the follwing windowAbb .4 you can choose the function
Abb.3 . In the follwing windowAbb .4 you can choose the function ![]() Abb.4 which should be added and confirm it by clicking „OK“.
Abb.4 which should be added and confirm it by clicking „OK“.

Für größere Ansicht klicken
To save your changes of the editing functions click on ![]()
![]() Abb.3 .You can restore the last saved settings by clicking
Abb.3 .You can restore the last saved settings by clicking ![]()
![]() Abb.3 .
Abb.3 .
Überschrift
| Bearbeitungsoptionen | Beschreibung | Optionen | Optionsbeschreibung |
|---|---|---|---|
 | Align the image on the vertical axis. | „First time only“ | If active, this option will be executed only at the first time. |
 | Färbt den angegebenen Bereich weiß. | Oben | Beginn des Bereichs der entfernt werden soll, in Pixeln vom oberen Bildrand. |
| Links | Beginn des Bereichs der entfernt werden soll, in Pixeln vom linken Bildrand. | ||
| Breite | Breite des Bereichs der entfernt werden soll in Pixel. | ||
| Höhe | Höhe des Bereichs der entfernt werden soll in Pixel. | ||
| „Nur beim ersten Mal“ | Wenn aktiv wird diese Option nur beim ersten Durchgang ausgeführt. | ||
 | Berechnet den Begrenzungsrahmen um die nicht weißen Pixel und schneidet das Bild auf den Rahmen zu. | „Nur beim ersten Mal“ | Wenn aktiv wird diese Option nur beim ersten Durchgang ausgeführt. |
 | Dreht das Bild um 180° um den Mittelpunkt. | „Nur beim ersten Mal“ | Wenn aktiv wird diese Option nur beim ersten Durchgang ausgeführt. |
 | Stellt die durchschnittliche Helligkeit des Bildes auf den angegebenen Helligkeitswert ein. | Helligkeit  | Wenn aktiv wird diese Option nur beim ersten Durchgang ausgeführt. |
 | Hintergrundfarbe basierend auf der Helligkeit eines Pixels auf weiß setzen. Nur Werte, die kleiner als der untere Grenzwert und größer als der oberen Grenzwert sind, werden zu weiß geändert. | Min. Helligkeit | Angabe nach RGB Wertebereich ist 0 bis 255 |
| Max. Helligkeit | Angabe nach RGB Wertebereich ist 0 bis 255 | ||
| „Nur beim ersten Mal“ | Wenn aktiv wird diese Option nur beim ersten Durchgang ausgeführt. | ||
 | Entfernen des angegebenen Randbereiches. | Obern | Anzahl von Pixelreihen die am oberen Bildrand entfernt werden. |
| Links | Anzahl von Pixelzeilen die am linken Bildrand entfernt werden. | ||
| Rechts | Anzahl von Pixelzeilen die am rechten Bildrand entfernt werden. | ||
| Rechts | Anzahl von Pixelreihen die am unteren Bildrand entfernt werden. | ||
| „Nur beim ersten Mal“ | Wenn aktiv wird diese option nur beim ersten durch gang ausgeführt. | ||
 | Entfernen alle Artefakte um die Füße. Dabei wird geprüft, ob die Helligkeit eines Pixels kleiner als der Ignorierenswert ist. Wenn ja, wird um den Pixel herum nach weiteren Pixeln gesucht, deren Helligkeit über dem Zählwert liegen. Wenn genügend Pixel vorhanden sind, wird der Pixel auf weiß gesetzt. | Größe | Maximale Größe von Artefakten die entfernt werden in Pixel. |
| Grenze - Ignorieren | Angabe nach RGB Wertebereich ist 0 bis 255 | ||
| Grenze - Zähler | Angabe nach RGB Wertebereich ist 0 bis 255 | ||
| Anzahl | Anzahl der Durchgänge dieser Bearbeitungsoptionen | ||
| „Nur beim ersten Mal“ | Wenn aktiv wird diese Option nur beim ersten Durchgang ausgeführt. | ||
 | Spiegelt das Bild vertikal. | „Nur beim ersten Mal“ | Wenn aktiv wird diese Option nur beim ersten Durchgang ausgeführt. |
| editing functions | description | options | options description |
|---|---|---|---|
 | Align the image on the vertical axis. | „First time only“ | If active, this option will be executed only at the first time. |
 | Colors the specified area white. | upside | Start of the area to be removed, in pixels from top of the image. |
| left | Start of the area to be removed, in pixels from the left edge of the image. | ||
| width | Width of the area to be removed in pixels. | ||
| height | Height of the area to be removed in pixels. | ||
| „First time only“ | If active, this option will be executed only at the first time. | ||
 | Calculates the bounding box around the non-white pixels and cut the image to fit in the box. | „First time only“ | If active, this option will be executed only at the first time. |
 | Turns the image by 180° around the center point. | „First time only“ | If active, this option will be executed only at the first time. |
 | Sets the average brightness of the image to the specified brightness value. | brightness  | If active, this option will be executed only at the first time. |
 | Set background color to white based on the brightness of a pixel. Only values less than the lower limit and greater than the upper limit are changed to white. | Min. brightness | Specification according to RGB value range is 0 to 255. |
| Max. brightness | Specification according to RGB value range is 0 to 255 | ||
| „First time only“ | If active, this option will be executed only at the first time. | ||
 | Removing the specified border area. | upside | Number of rows of pixels removed from the top of the image. |
| left | Number of rows of pixels removed from the left edge of the image. | ||
| right | Number of rows of pixels removed from the right edge of the image. | ||
| Rechts | Anzahl von Pixelreihen die am unteren Bildrand entfernt werden. | ||
| „First time only“ | If active, this option will be executed only at the first time. | ||
 | Remove all artifacts around the feet. This checks whether the brightness of a pixel is less than the ignorable value. If so, it searches around the pixel for other pixels whose brightness is above the count value. If there are enough pixels, the pixel is set to white. | size | Maximum size of artifacts that will be removed in pixels. |
| Grenze - Ignorieren | Specification according to RGB value range is 0 to 255. | ||
| Grenze - Zähler | Specification according to RGB value range is 0 to 255. | ||
| number | Number of passes of these machining options. | ||
| „First time only“ | If active, this option will be executed only at the first time. | ||
 | |||
| If active, this option will be executed only at the first time. |
